Monday, December 17, 2007

Personal and Imaginative - 3rd Grade Compositions

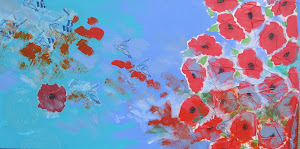
first on the left: I and The Village by Marc Chagall; three on the right Sample Student Artwork

- Third graders studied the artwork of Marc Chagall, focusing on the painting I and the Village. (see artwork) Students noticed and analyzed the artist's use of personal icons in his composition.

- They came up with possible answers for questions like "Why is the man's face green?" "Why is the woman floating upside down?" and "Why is there a woman milking a cow inside a goat's head?"

-The students concluded that there must be important reasons for the artist's choices in color, size and placement of his icons.

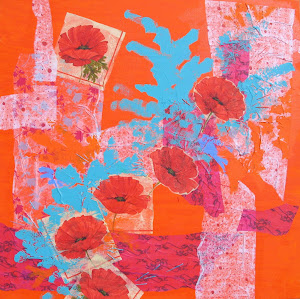
Students made an imaginary composition using their own personal icons. Here's what they did:
Brainstorming
Students began by making different icons (symbols) for things that are significant in their lives, such as their favorite food, an important person, a hobby or sport they are involved in, or a special toy. Icons are pictures that represent a person, place, thing or idea.

Sample Student Worksheets
Sketching
Next, students began drawing a sketch to figure out how they would arrange their icons to create an interesting composition.
Students had to meet the following requirements within their compositions:
- Include at least 6 icons

- Place 1 icon inside another icon to create a relationship

- Make at least 2 icons large to create emphasis

- Include a horizon line to create a sense of space

Students also learned that a strong composition makes the eye move around the whole page, so they worked on using the whole page for their sketches!

Sample Student Sketches
Drawing With Glue
On black paper, students drew their final composition using Elmer's liquid glue! The glue dries overnight. When it's dry, it's clear - which makes the lines look black!
Adding Color with Chalk
As a final step, students added colored drawing chalk to make the black glue lines pop out! Chalk does not stick to the dried glue lines. Students practiced color blending and mixing, filling in all parts of the paper with vibrant color.


Sample Student Artwork
_
Attention 3rd grade parents - I need help! All third grade classes need their work spray-fixed in order to take it home. This can be very time consuming for one person! If you think you have some time to help out with this please email me at kweymout@houstonisd.org . The students really want to take their work home... WE'D REALLY APPRECIATE YOUR HELP!

Tuesday, December 11, 2007


Kindergarten
Self-Portraits!

Kindergartners have been learning to draw their faces so that they look really real!

Kinder Self-Portrait Display

Here are some of the ways they learned to make a face look real:

1. The shape of the head is similar to an oval.

2. The eyes are similar to the shape of a football or lemon, and sit in the very middle of the head.

3. The mouth has two lips - and the top lip is kind-of shaped like an "M"!

4. The nose has three distinctive parts - the bridge, the tip and the nostrils (so we draw all three!)

5. The ears sit on the sides of the head just in between the top of our eyes and the tip of the nose.


Student Artwork Samples

Here's the steps we took to make our self-portraits:
Step 1: Draw all parts of the face, neck and shoulders using Sharpie.

Step 2. Use crayons to color the portrait using imaginary, expressive colors. (We pushed hard with the crayons to make the colors look bright.)

Step 3: Paint over the portrait using watercolor tempera paint. (Using watercolor over crayon is called a "resist". )
Art on display near the nurse's office - take a look!

Thursday, December 6, 2007

4th and 5th Grade Observation Drawing Display

4th and 5th graders have been working hard to learn and master different ways to draw objects so that they look realistic. Here's what they've been learning:

Observation Drawing:
Observing (really looking!) at an object and drawing exactly what is seen

Drawing Techniques:
Contour Line Drawing - describing form and details using line
Continuous Contour Line Drawing - Contour line drawing made without lifting drawing utensil
Student samples of these two techniques below:


Value Drawing - Adding values through shading to describe how the light hits the object
Subtractive Value Drawing - Subtracting values by erasing to describe how light hits the object
Student samples of subtractive value drawings below:


Other Vocabulary:
Highlights
Shadows
Light Source
Value Scale


Art on display upstairs in the 4th and 5th grade pod areas! COME SEE IT SOON!
We've created... Monsters!!!

2nd graders have worked so hard on these creative creatures! Some are friendly, some are scary, and some are just plain silly! Take a look:

(Sample student artwork from the display.)

Here's what they did:
Step 1: Students came up with ideas for their monsters by first thinking about what their monster's personalities would be like. They imagined where their monster would live, what it would like to eat, and what kinds of things it would enjoy.
Step 2: Students drew their monsters using black and white crayons. Students were given images of animals and asked to include at least three different animal parts in their monsters.
Step 3: Students painted their monsters using a variety of colors.
Painting Process:
Resist - when two materials that do not mix push away from one another
Students saw how crayon on paper resists watercolor paint by pushing it off when its painted over.

All About Color:
Students added and mixed these different types of colors during different stages of the painting:
Primary Colors - colors that cannot be made with any other colors; red, blue, and yellow
Secondary Colors -colors made when two primary colors are mixed; orange, purple, and green
Tint - any color mixed with white (pink, for example is red + white)

ON DISPLAY NOW - HALLWAY NEAR ART ROOM!!!!!!!!!!!!!